Its almost Christmas time and that means we have to decorate out nails too ^^ For this tutorial, I'm gonna show you how I do snowflakes. As a tip, having a picture of snowflakes as reference would be helpful. I hope you guys enjoy:
These are the nails we will be working on. Ill show you my right hand at the end also.
We will be using these colors. UPDATE: I did not use the sparkle color and I did not use the green acrylic paint either.
Started with 'Sensitivity' base coat
Start off with any green you would like. Here I'm using a 'Da Bush' by Essie
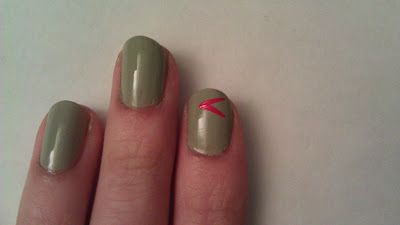
After your nails are completely dried, we will start painting on the snowflakes with the paintbrush and red acrylic paint. Start off with a sideways 'V'
Paint another 'V'
and another...
Basically continue to draw lines wherever you like for the snowflake. I will skip my ring finger since it is kinda complex and would take too long for all the steps...
For the pointer finger: draw lines between the 'v's. Now on to the ring finger: Make a dot and draw a line on top.
add two more like so.
draw another two on the bottom.
Now draw little lines at the end of each of the 5 original lines.
Note: this could get confusing... Draw a triangle
Paint 3 lines coming out of it
Add more lines coming out and draw little lines at the tips like before.
Paint a basic snowflake on the thumb
Draw smaller lines in between the main ones then finally top it off with small lines on the tips.
Get out some silver paint or nail polish and dot the tips and centers of the snowflakes as you like.
Add a topcoat and you're finished!
I like my right hand more for once. (shocking I know) Try to do the designs on the right hand too ^^
Here's a close up.
Thanks for reading! Keep following and Comment below!
Shout out to Jennifer! (thnx for the acrylics!!!)


hhheheheheee
ReplyDeletebetter use the acrylics alot! D:<