Pages

Sunday, April 29, 2012

Zipper Nail Tutorial

Hey Guys,
This time around we're going to try something new: Zipper inspired nails! This design is very easy and fast compared to past ones so let's get started! I will be showing you the left hand. Since the rest is self explanatory
                                                         This is what we will be working on:
Left Hand
Right Hand


I forgot to take a picture of the supplies so here's the list : Bright Pink Nail Polish ( Secret Stash, Essie)
Black and gold acrylic paint and paint brushes!
Start off with base coat.
Paint on 2 coats of pink polish
Using black acrylic paint, on the middle finger, paint on a rectangle.

Add a thick black line extending from the box
and another
Horizontal line across bottom of pinkie
Add one on top
Using gold polish dab on a line on the side. Do not go across.
Add one on the other side
Continue
As you go up, make sure to leave spaces in between. Kind of like a zig-zag that doesn't touch.
Do the same with the pinkie
Apply top coat slowly as to not smear the design.
And we are done! (left hand)
Right hand.


Thanks for reading! Comment and keep following for more updates!


Tuesday, April 17, 2012

Fisherman Nails

Hey Guys,
No tutorial this week, just a picture since it needlessly hard to do these nails. Having steps would be too confusing. Got a new camera so the quality should be far better than before. So enjoy!


Plenty of fish out in the sea~


Thanks for reading, Comment and keep following for more updates!

Friday, April 6, 2012

OPI Nail Envy Strengthener Review & Haul

Heys Guys,
This week I have a Haul of things I bought: some quite recently and some a few weeks ago. Also, there's gonna be a Review for O.P.I's Nail Envy Strengthener. So stick around till the end for the REVIEW.
So this is all the stuff I got recently.
So I got this plain White color from Essie.  Its was also re-released from their Summer collection.

Next is a Polish from Essie's Luxe Effects line.
Very shiny with fine gold glitter. Has a jelly-like consistency when applied.
4-in-1 Nail buffer from Target.
This is my second one since my first one got used up and worn.
Nail Stickers from the FaceShop
Can be used for French Tip manicures. A Korean brand.

REVIEW
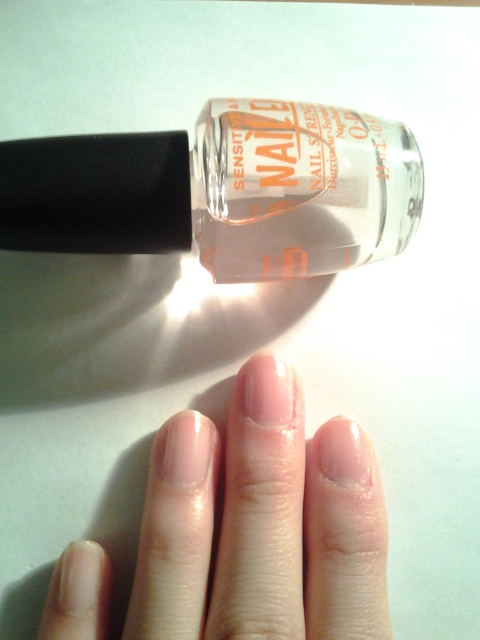
This was the one I bought. The Nail Envy for Sensitive and Peeling Nails.
This has always been one of my problems. If I use nail polish for too long a period of time, my nails will start to peel and crack so I bought this to see if it could help.
First off, I LOVE IT. There are 6 different ones to meet different nail problems, Brittleness, Soft & thin nails, Dry, Cracking etc. But I find that this works the best for me. I love that it has all the nutrients and aloe vera etc in it and that it doesn't have the Big 3 chemicals in it.
It comes like this with instructions on how to use.
I followed the instructions EXACTLY and find that it really does work. I put it on for seven days and added  another coat as explained in instructions. Trust me, follow what it says and you will definately get results.
So this is what it looked like when I applied it on my nails.
and AFTER I removed it. I could see a difference. My nails felt harder and stronger. It did not leave my nails yellow at all and my nails did not peel like they usually do after I remove any sort of polish. In fact, I could even see that it reduced some Ridges on my nails! (The ugly horizontal ones) It doesn't remove the ridges but I could see an improvement.
Like all O.P.I polishes, it has the pro-wide brush which means you can use less coats of the product.
It picks up the polish very well and with one dip I could paint on 2 nails, one after the other.

All in all, I am very impressed with this product. For retail it's around $17 and I think it would be worth buying again. I saw an obvious difference in the health of my nails and I can find nothing bad about it really. 
Pros : Heals, Hardens, strengthens and improves sensitive & peeling nails.
Cons: none. 
I'm not saying this will work for everyone since people have different nail types, but for me, it worked wonders!


Thanks for reading. Comment and keep following for more updates!
I was not paid for this review. It is my own, honest opinion.


Sunday, April 1, 2012

Black Cat Tutorial

Hey Guys,
This time we will be doing a nail tutorial inspired by a picture I saw on tumblr :D I thought it would look great on nails so here we are. Pretty easy design and still matches with the spring season. Let's get started!
Hai Derrrr. I'm the going to be the Design today~
Cute right?
Pink color is Essie's : A Crewed Interest. I forgot to add it in the pic but have BLUE paint ready too!
Start off with base coat like always
Put on 2 coats of light pink polish
Prepare Black Acrylic paint. Mix with water if needed.
Start off by drawing a line for the side of the cat.
Draw the Outline of a cat.
Fill it in.
For the tail, paint a curved stroke.
Thicken the line.
Using a dotting tool. Place 2 large white circles on the cat.
While the eyes dry, paint a medium sized circle for the ball of yarn on your thumb.
Try not to make it perfectly circular because yarn balls are usually lumpy.
Draw a string of yarn coming out of it.
Add another.

Pretty straight forward. just follow above
loop-de-loop
Went back in for another stroke. Felt empty
Do whatever string design you like behind the cat.
behind the tail.
Now that the eyes have dried, add the pupils. make the fill up the white. We don't just want specks as pupils.
going in for highlights on the ball of yarn. Mix 
Blue and white for a lighter shade.
Continue and add more if you like.
Add light blue highlights along the string to give more dimension to the design.
Add Topcoat for extra shine and that's all!


I had one more hand pose but it got blurry,so just one picture of the finished product this time :)


Thanks for reading! Comment below and keep following for more updates!