Pages

Friday, December 23, 2011

Christmas Haul?

Hey Guys,
Anyway so its this time of year again, CHRISTMAS!!! So basically this post isn't really a 'haul' but just some nail polish I was gifted. So lets get started!
These are all the nail polishes I received.

First up, are these nail polishes from H&M. Really cute and small. Its something you would carry in your purse on the go.
Left to Right: Blue, Red, Black (those are the names)

It looks like this from the back.

Next up, We have Essie! I <3 Essie and this one comes in such a pretty pink color. It certainly stands out.

Called "Secret Stash". The only problem I have with it (besides not having tried it out yet) is that it says it comes with 15ml of product but the level of nail polish looks a little low from the top.
Second to last on the list is this nail polish you can buy from FaceShop. It unfortunately does not have a name.

Its a a metallic, shimmery purple, blue, and sky blue all together. It really reflects in the light, Can't wait to try it.
Last is the Sky Blue/Silver metallic color, its actually more blue than silver and Its also from FaceShop.

So shimmery....but I still have one complaint. This line of nail polish (brand) does not include the little silver balls usually put in polish to break up the product if it starts getting clumpy. Oh well, what can you do?

From Left to right: Strongest smelling Nail polish to the least strongest.

Original packaging of H&M polishes.

Thnx for reading, keep following and comment below!

Sunday, December 18, 2011

Christmas Snowflake Tutorial

Hey Guys,
Its almost Christmas time and that means we have to decorate out nails too ^^ For this tutorial, I'm gonna show you how I do snowflakes. As a tip, having a picture of snowflakes as reference would be helpful. I hope you guys enjoy:

These are the nails we will be working on. Ill show you my right hand at the end also.
We will be using these colors. UPDATE: I did not use the sparkle color and I  did not use the green acrylic paint either.
Started with 'Sensitivity' base coat
 Start off with any green you would like. Here I'm using a 'Da Bush' by Essie
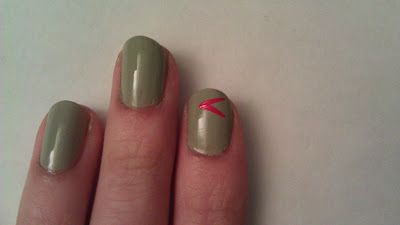
After your nails are completely dried, we will start painting on the snowflakes with the paintbrush and red acrylic paint. Start off with a sideways 'V'
Paint another 'V'
and another...

Basically continue to draw lines wherever you like for the snowflake. I will skip my ring finger since it is kinda complex and would take too long for all the steps...

 For the pointer finger: draw lines between the 'v's. Now on to the ring finger: Make a dot and draw a line on top.
add two more like so.
draw another two on the bottom.
Now draw little lines at the end of each of the 5 original lines.
 Note: this could get confusing... Draw a triangle
 Paint 3 lines coming out of it
Add more lines coming out and draw little lines at the tips like before.
Paint a basic snowflake on the thumb
Draw smaller lines in between the main ones then finally top it off with small lines on the tips.
Get out some silver paint or nail polish and dot the tips and centers of the snowflakes as you like.
Add a topcoat and you're finished!

I like my right hand more for once. (shocking I know) Try to do the designs on the right hand too ^^
Here's a close up.

Thanks for reading! Keep following and Comment below!
Shout out to Jennifer! (thnx for the acrylics!!!)

Sunday, December 11, 2011

Mini Haul 12/11/11

Hey Guys,
There's no tutorial this week since I just removed my nail polish and I saw that my nails were very damaged. I need to give a it a week to rest so instead here's a haul of a few things I bought last Friday. This is not everything but I was too lazy to post up the last thing. so here it is:

 I bought these three from Essie. (names posted later)
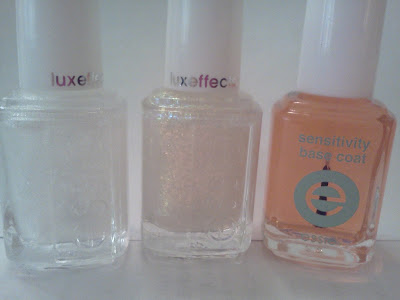
First off is this Essie Luxe Effects polish. Luxe Effects is their newly released collection right after the winter collection. There are five in total. I'll post up the others if I decide to get them.
"Shine of the Times"
Its a really nice glitter polish that has orange, yellow, white glitter that looks green and blue and green as you turn it in the light. This picture doesn't do this polish justice.
 Next up: another glitter polish in the luxe collection.

"Pure Pearlfection" 
"Pure Pearlfection" may seem similar to "Shine of the times" but it's actually very different. This polish has extremely fine white glitter, not silver. and It has a really smooth jelly-like consistency when you apply it onto your nails. Perfect for a Christmas/Winter tutorial (*hint hint) 
I also got a much-needed base coat~ My nails ALWAYS split and flake (I kno that sounds nasty). That's the reason I can't do a tutorial this week. But then by coincidence I found this ah-mazing basecoat!
Its Hypoallergenic and Its made for people with weak nails that are prone to chip and split. I haven't tried this out yet, but I definitely will soon.
It's a basecoat but instead of clear, It comes a a pinkish-orangey color.
It looks like those clear/colored polishes. Hopefully this is everything it claims to be.
And that's it! Last words: I think the luxe polished should be used over another polish because on it's own, it usually looks plain.

Thnx for reading, keep following for more updates and comment below!


Sunday, December 4, 2011

Triangle-mani tutorial

Hey Guys,
Back for another tutorial! Its very simple and easy but you have to be patient when doing this. (but its easy!) So  I hope you enjoy!
I got inspiration from this.
This is what we will be working on today.
 
Supplies you will need. (I will post names of polish at the end)
and you need tape.
Start off with basecoat

Apply the beige color on All nails except ring finger. Let this dry COMPLETELY

Get your tape ready
Cut it into a triangular shape.
Stick it on your nail after it has completely dried. Press on the tape to make sure it is firmly stuck on. (but not too tight)
Apply the brown on top of the nail. CAUTION: Try your best to avoid putting Nail polish onto the tape because it will somehow weigh it down and make it Extremely hard to rip off later. I would know since I had to do this over, after making this mistake
Continue this process with All nails Except the ring finger. Using a tweezer to rip off the tape will make it much easier and don't forget to rip off the tape 4 sec after applying polish. Do NOT let the polish dry on ur nail while the tape is still on. (btw ignore the ugliness of the pointer finger, I acually re-did it after taking pictures)
This step is optional for the ring finger.  We will be using the brown beads.
Put some top coat on a scrap paper.
Apply the beads carefully in a triangle shape. start from the middle, work your way down, then go to the top and work your way down.
Ring finger finished! Apply topcoat gently on all fingers. Don't worry the beads will not come loose.
The final product with the extra nail polish on my skin cleaned off!
Both my hands. I don't know if you can tell, but the triangle-X design on my right hand is reversed.

Polish used: Essie: Very Structured<----amazingly opaque in ONE coat! creamy too ^^ 
Essie: Topless and barefoot.

Thanks for reading, Comment and keep following for more updates!